
AC condenser replacement service costs between $1,200 and $4,200 on average, though you may pay as little as $300 to $1,200 for labor if your unit is still under warranty. The final price depends on factors like the size of your system, the brand you choose, and how easy it is for technicians to access your unit.
Your air conditioner’s condenser is one of the most important parts of your cooling system. When it fails, you might face weak airflow, strange noises, or no cool air at all. Understanding when to repair or replace this component can save you money and keep your home comfortable.
This guide will walk you through everything you need to know about AC condenser replacement. You’ll learn how your condenser works, how to spot warning signs of failure, and what to expect during the replacement process.
Here’s what you’ll find below:
- Understanding the role of your AC condenser
- Signs you need AC condenser replacement
- Choosing the right AC condenser replacement
- The professional replacement process
- Maintaining your new AC condenser
You’ll also discover how to choose the right replacement unit and keep it running smoothly for years to come.
Understanding the role of your AC condenser
The condenser unit handles the critical task of releasing heat from your home to the outside air. Your AC system’s ability to cool depends on how well this component functions, and problems with the condenser directly affect your comfort and energy bills.
What an AC condenser does in your cooling system
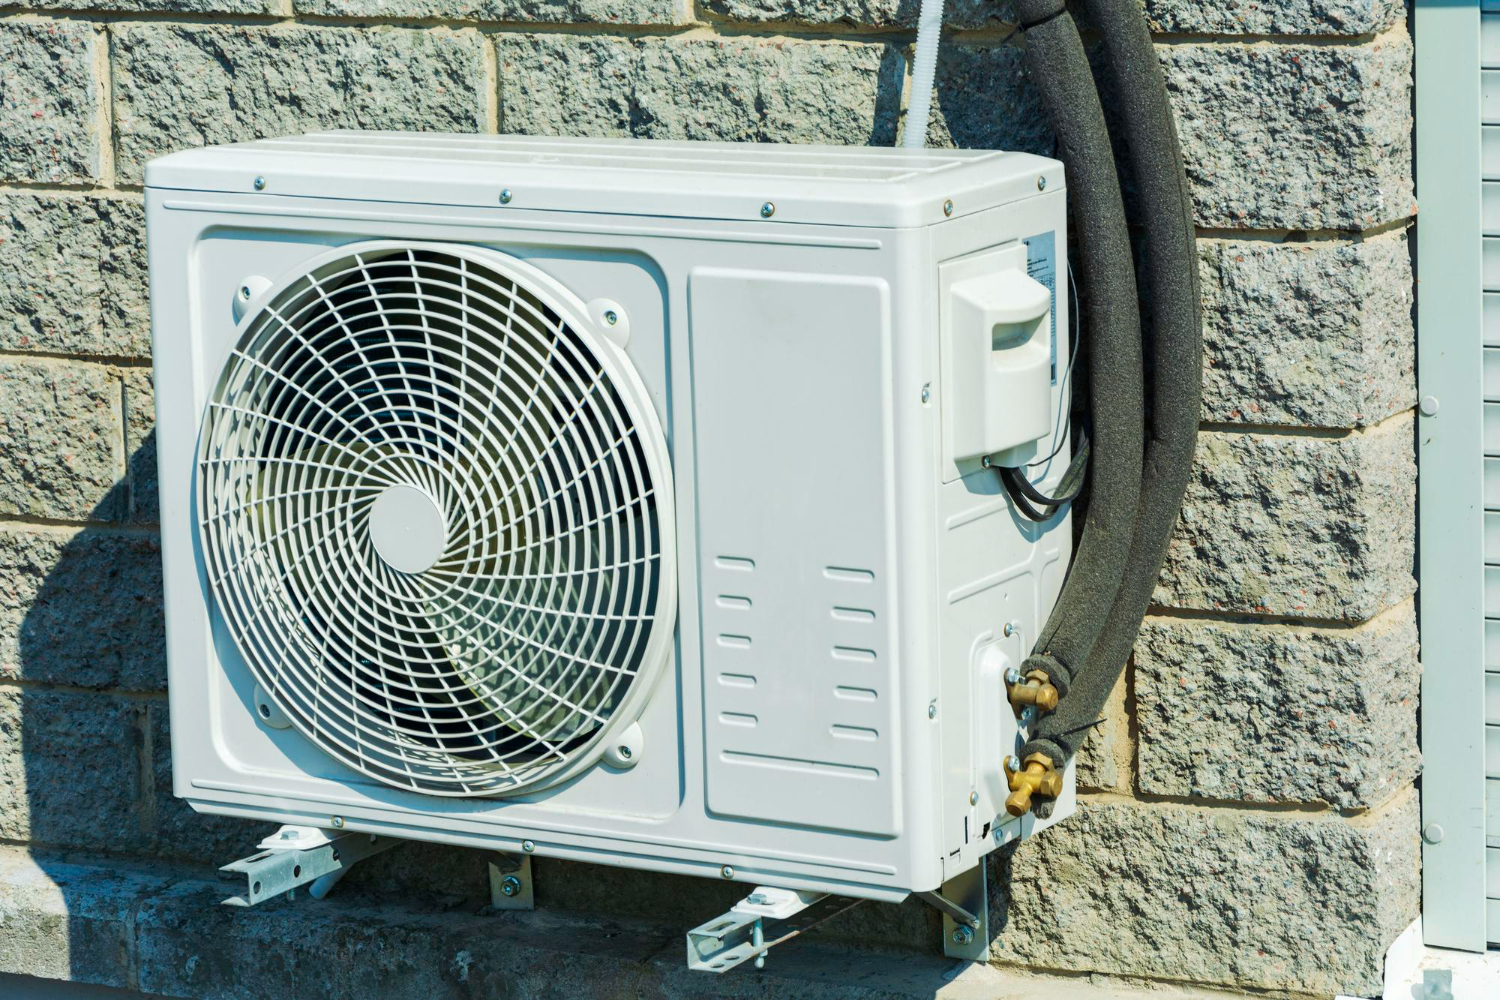
The AC condenser is the outdoor unit of your split-system air conditioner. It sits on a concrete pad next to your home and contains three main components that work together to remove heat from your house.
The compressor pressurizes refrigerant that has absorbed heat from inside your home. This pressurization process makes the refrigerant hot so it can release that heat outdoors. The condenser coil then takes this hot, pressurized refrigerant and allows it to release the heat into the outside air.
A fan pulls air across the condenser coil to help dissipate the heat more quickly. Once the refrigerant releases its heat, it cools down and travels back inside to your evaporator coil. This continuous cycle keeps your home cool by constantly moving heat from inside to outside.
How the condenser impacts efficiency and comfort
A properly functioning condenser determines how much energy your AC system uses and how well it cools your home. When your condenser operates efficiently, it releases heat quickly and uses less electricity to maintain comfortable temperatures.
If your condenser struggles to release heat, your compressor has to work harder and run longer to cool your home. This increases your energy bills and puts extra wear on the entire system. You might notice your AC running constantly or taking longer to reach your desired temperature.
A well-maintained condenser helps your system reach the thermostat setting faster and maintain consistent temperatures throughout your home. Regular cleaning and maintenance prevent performance drops that make your home less comfortable.
Common issues that affect condenser performance
Dirt and debris buildup on the condenser coil blocks airflow and prevents heat from escaping properly. Leaves, grass clippings, and dust accumulate on the fins and reduce efficiency by up to 30%.
Bent or damaged fins restrict air movement across the coil. Even minor damage from lawn equipment or hail impacts your system’s ability to cool effectively.
Refrigerant leaks reduce the amount of heat your system can transfer. Low refrigerant levels force your compressor to work harder and may cause complete system failure. Other problems include failed fan motors, electrical issues, and worn compressor components that prevent proper heat release.
Signs you need AC condenser replacement
A failing AC condenser shows clear warning signs before it stops working completely. Recognizing unusual sounds, declining performance, and recurring problems helps you decide when repair costs exceed the value of replacement.
Unusual noises or vibrations from the unit
Your AC condenser should run quietly with minimal vibration. Loud banging, grinding, or rattling sounds indicate internal components are loose or damaged. These noises often point to failing bearings, a worn motor, or debris inside the unit.
Excessive vibrations mean the condenser’s mounting has failed or internal parts have come loose. You might notice the entire unit shaking or moving during operation. This creates additional stress on refrigerant lines and electrical connections.
Buzzing or humming sounds that grow louder over time suggest electrical problems. The contactor or capacitor may be failing. A high-pitched squealing noise typically means the fan motor bearings need lubrication or replacement.
If you hear these sounds regularly, a technician should inspect your condenser. Some noises indicate simple fixes, but persistent or worsening sounds often mean the condenser has reached the end of its useful life.
Poor cooling or rising energy bills
Your AC condenser releases heat from your home to the outside air. When it fails, your system struggles to cool your space effectively. You’ll notice rooms staying warm despite the AC running constantly.
Your energy bills climb because a failing condenser forces the entire system to work harder. The compressor runs longer cycles trying to reach your desired temperature. This extra runtime adds significant costs to your monthly electric bill.
Warm air from your vents means the condenser isn’t processing refrigerant properly. The coils may be corroded or the fan might not be moving enough air. These issues prevent proper heat exchange.
You might see ice forming on the condenser coils or refrigerant lines. This happens when the unit can’t maintain correct pressure and temperature. Frozen coils block airflow and reduce cooling capacity further.
Frequent repairs or refrigerant leaks
Repeated repairs within a short timeframe signal your condenser is declining. If you’ve called for HVAC condenser repair three or more times in two years, replacement becomes more cost-effective than continued fixes.
Refrigerant leaks are serious problems. You might notice oil stains around the condenser or hissing sounds from the refrigerant lines. Low refrigerant levels damage the compressor and reduce cooling efficiency.
Corrosion on the condenser coils creates pinhole leaks that worsen over time. Salt air in coastal areas or chemical exposure accelerates this damage. Once coils corrode extensively, repair isn’t practical.
The cost of repairs matters when making your decision. If a single repair costs more than half the price of a new condenser, replacement makes financial sense. Factor in the unit’s age alongside repair frequency.
Choosing the right AC condenser replacement
Selecting the correct replacement condenser requires evaluating your home’s cooling requirements, considering energy efficiency ratings, and verifying compatibility with your current HVAC components.
Matching capacity to your home’s cooling needs
Your home needs a condenser sized correctly to cool your space without wasting energy or failing to meet comfort demands. An undersized unit runs constantly and struggles to maintain temperature. An oversized unit cycles on and off too frequently, which reduces efficiency and increases wear.
HVAC professionals calculate the right capacity in tons based on several factors. Your home’s square footage serves as the starting point. A typical estimate is one ton of cooling for every 400-600 square feet.
Per the U.S. Department of Energy (DOE), proper sizing matters because an oversized central AC won’t adequately remove humidity and an undersized unit won’t cool effectively on the hottest days—so condenser capacity should be selected based on a load calculation, not a rule of thumb.
Other factors affect this calculation. These include your climate zone, insulation quality, ceiling height, window count and placement, and sun exposure. A professional load calculation accounts for all these variables.
Most residential homes need condensers between 1.5 and 5 tons. A 1,500 square foot home typically requires a 2.5 to 3-ton unit. Getting an accurate load calculation prevents problems and keeps AC condenser replacement cost reasonable by avoiding oversized equipment.
Energy-efficient condenser options
Modern condensers offer significant efficiency improvements over older models. The SEER2 rating measures how efficiently a condenser uses electricity to cool your home. Higher ratings mean lower operating costs.
Minimum SEER2 requirements vary by region. Northern states require at least 13.4 SEER2. Southern states mandate 14.3 SEER2 or higher.
Upgrading to higher efficiency reduces monthly bills. A 16 SEER2 unit uses about 20% less electricity than a 13 SEER2 model. Energy-efficient AC systems may qualify for utility rebates or tax credits that offset higher upfront costs.
Variable-speed compressors provide better efficiency than single-stage units. They adjust output to match cooling demand instead of running at full capacity constantly. This saves energy and improves temperature control.
R-32 refrigerant offers better efficiency and environmental benefits compared to older R-410A systems. Check what refrigerant options work with your replacement condenser.
Compatibility with existing HVAC systems
Your new condenser must match your indoor air handler or furnace. Mismatched components reduce efficiency and can cause premature failure. The refrigerant type must match between indoor and outdoor units.
Brand compatibility matters for warranty coverage and optimal performance. Many manufacturers design their systems to work best with matching components. Using a different brand for your condenser may void warranties on your indoor equipment.
The condenser’s tonnage must match your indoor coil capacity. Your existing line set (copper tubing) may work with a new condenser if properly sized. This can reduce AC condenser replacement cost by avoiding additional installation work.
Electrical requirements need verification. Check that your home’s electrical panel and disconnect box can handle the new condenser’s voltage and amperage needs. Some high-efficiency models require upgraded electrical service.
A qualified HVAC technician should verify all compatibility factors before purchase. They ensure proper refrigerant charging, airflow, and system balance for reliable operation.
The professional replacement process
A proper condenser replacement involves careful inspection, systematic removal and installation, and thorough testing to make sure your AC system runs at peak performance. Professional technicians follow specific steps to protect your investment and avoid future problems.
Pre-installation inspection and preparation
Your technician starts by checking the electrical connections, refrigerant lines, and mounting pad where the old condenser sits. They measure voltage levels and inspect the condition of existing components to identify any issues that could affect the new unit.
The team verifies that the new condenser matches your system’s specifications and cooling capacity. They also check local building codes and permit requirements for Los Angeles County. This step prevents compatibility problems that could damage your system or reduce its lifespan.
Proper preparation includes shutting off power at the breaker and disconnect box. Technicians recover any remaining refrigerant from the old system using EPA-approved equipment. They also clear the work area and protect nearby landscaping or structures from potential damage during the replacement.
According to the U.S. EPA, Section 608 refrigerant rules require technicians who maintain, service, repair, or dispose of equipment that could release refrigerants to be certified—reinforcing that condenser replacement should include compliant refrigerant recovery and handling.
Step-by-step condenser removal and installation
The technician disconnects the electrical wiring and refrigerant lines from your old condenser unit. They carefully remove the unit from its mounting pad and inspect the pad for cracks or damage that needs repair.
After setting the new condenser in place, they level it properly to prevent vibration and premature wear. The team connects refrigerant lines using proper brazing techniques and pressure tests all connections for leaks. They run new electrical wiring if needed and ground the unit according to electrical codes.
Key installation steps:
- Secure mounting and leveling
- Professional brazing of copper lines
- Proper electrical connections
- Refrigerant line insulation
- Condensate drain setup
Testing and calibrating the new system
Once installation is complete, technicians vacuum the refrigerant lines to remove moisture and air. They charge the system with the correct amount of refrigerant based on manufacturer specifications.
The team runs multiple test cycles to check temperature output, airflow, and pressure readings. They measure the temperature difference between supply and return air, which should typically range between 15-20 degrees. All electrical components get tested under normal operating conditions.
Your technician calibrates the thermostat and verifies that all safety controls work properly. They check for unusual noises, vibrations, or refrigerant leaks before giving you a detailed explanation of the new system’s operation and maintenance needs.
Maintaining your new AC condenser
After investing in a new AC condenser, proper maintenance protects that investment and keeps your system running efficiently for years. A solid cleaning schedule, regular performance checks, and knowing when to call experts will help you avoid costly repairs down the road.
Recommended cleaning and maintenance schedule
Clean the exterior of your condenser unit every month during cooling season. Remove leaves, grass clippings, and debris from around the unit using a garden hose or soft brush.
Check the condenser coils every three months for dirt buildup. Dirty coils reduce cooling efficiency by 15-30% and force your system to work harder. You can gently spray the coils with a hose from the inside out to remove surface debris.
Replace or clean your air filter monthly when the system runs regularly. A clogged filter restricts airflow and puts extra strain on your condenser.
According to the U.S. Department of Energy (DOE), regular maintenance of an air conditioner’s filters and coils is essential for efficient performance, and neglecting maintenance leads to declining performance and higher energy use—supporting a consistent cleaning schedule after a new condenser is installed.
Schedule professional maintenance twice a year—once in spring before heavy use and once in fall. Professional AC service includes checking refrigerant levels, testing electrical connections, lubricating moving parts, and inspecting components you can’t easily access. This regular service extends your equipment life by 5-7 years.
Monitoring performance to prevent future issues
Watch for signs that your condenser isn’t working properly. Your home should cool evenly without hot spots or weak airflow from vents.
Listen for unusual sounds like grinding, squealing, or rattling coming from the outdoor unit. These noises often signal loose parts or motor problems that need attention.
Check your energy bills each month. A sudden spike in costs without increased usage means your system is losing efficiency. Monitor the area around your condenser for ice buildup on the refrigerant lines or pooling water, which indicates drainage or refrigerant issues.
Test your thermostat regularly to ensure it accurately controls temperature. Set it a few degrees lower and verify the condenser kicks on within minutes.
When to call a professional for service
Contact a professional immediately if your condenser doesn’t turn on or keeps shutting off unexpectedly. These issues often involve electrical problems or refrigerant leaks that require specialized tools and training.
Call for service when you notice reduced cooling capacity even after basic maintenance. A technician can diagnose compressor problems, refrigerant levels, or blocked coils that need expert repair.
Schedule professional help for any refrigerant-related work. Federal regulations require certified technicians to handle refrigerant due to environmental concerns. Never attempt to add or remove refrigerant yourself.
Reach out to professional AC service if you see physical damage to the condenser unit, such as bent fins, damaged coils, or pest infestations inside the unit. Professionals have the right tools to repair these issues without causing further damage.
Conclusion
AC condenser replacement is a significant investment that requires careful thought. You need to weigh the age of your system, repair costs, and energy efficiency when making your decision.
Professional diagnosis is essential. A qualified HVAC technician can tell you whether repair or replacement makes financial sense for your situation. They will examine the compressor, coil, and fan to determine the extent of damage.
Regular maintenance extends condenser life and prevents major issues. Simple steps like cleaning debris from the unit and scheduling annual tune-ups protect your investment.
The right choice depends on your budget and long-term plans. Replacing a condenser on a newer system often makes sense. However, older systems with multiple failing components typically need complete replacement rather than continued repairs.
Work with licensed professionals who provide detailed estimates and explain your options clearly. Quality installation matters as much as the equipment itself. Proper sizing and installation ensure your new condenser operates efficiently for years to come.
Make your decision based on facts and expert advice rather than temporary fixes that delay inevitable replacement.
Schedule an on-site diagnostic and written estimate with Swift Pro so you can confirm whether the failure is isolated to the outdoor unit and complete AC condenser replacement service with correct sizing, refrigerant compatibility, and code-compliant electrical connections.
